Applies to Event Management & Employee Training Management
Manually managing RSVP responses in the enrollment list
Important – How RSVP normally works
When using our Event Management or Employee Training Management apps, all enrolled users automatically receive a calendar invitation for the event. They can respond (Accept, Tentative, Decline) directly from Outlook, and their RSVP status is tracked without requiring any manual updates in SharePoint.
The customization described in this article is optional and intended only for scenarios where customers want to allow users or administrators to manually adjust RSVP values within SharePoint.
Note on Support & Responsibility
The solution provided below is a custom extension to the your SharePoint website. While you are free to use or adapt this JSON formatting, it is your responsibility to test the behavior in their environment.
As this is a customization, it is not covered by our standard support.
Overview
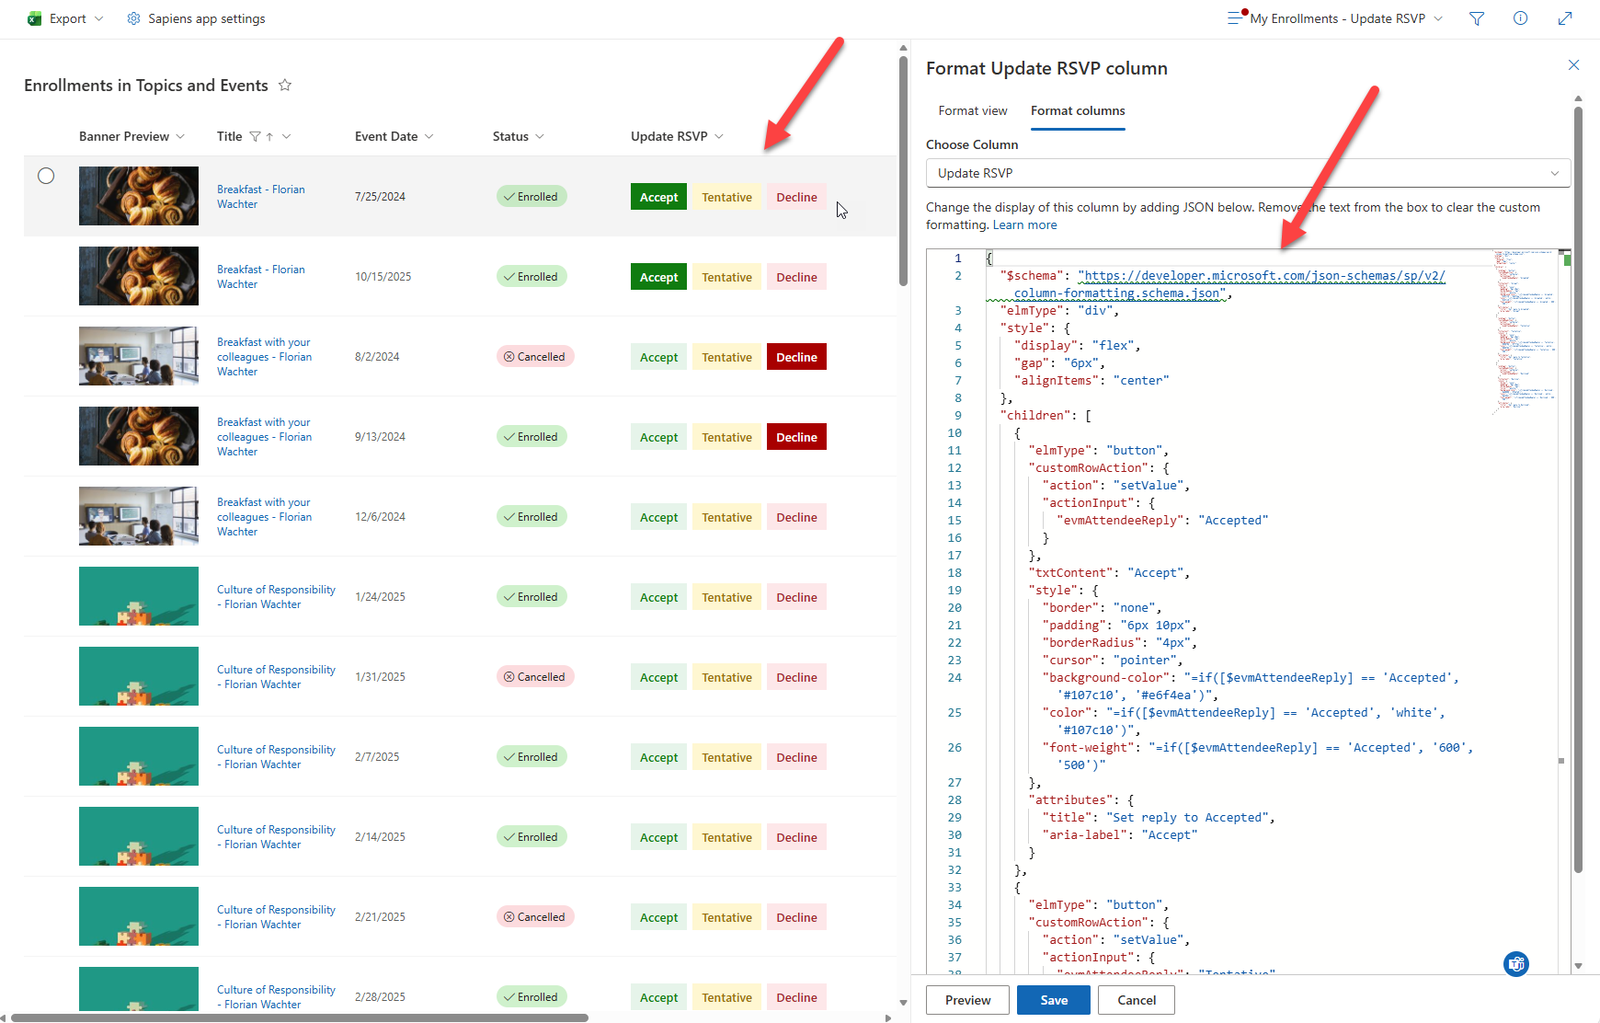
In some scenarios, users may need the ability to manually update their RSVP status directly within the Enrollment SharePoint list. This article explains how to enable this by adding a custom RSVP column with interactive buttons (Accept, Tentative, Decline) using SharePoint JSON column formatting.
This approach provides a simple and intuitive experience and can be surfaced directly within your event pages.
1. Create an RSVP column
Navigate to the Enrollment list in SharePoint.
Choose Add column → Single line of text.
Name the column (e.g., RSVP or Update RSVP).
Save the new column.
2. Apply JSON column formatting
Once the column is created:
Open the column header menu.
Select Column settings → Format this column.
Switch to Advanced mode.
Paste the JSON below into the editor.
Select Save.
JSON:
{
  "$schema": "https://developer.microsoft.com/json-schemas/sp/v2/column-formatting.schema.json",
  "elmType": "div",
  "style": {
    "display": "flex",
    "gap": "6px",
    "alignItems": "center"
  },
  "children": [
    {
      "elmType": "button",
      "customRowAction": {
        "action": "setValue",
        "actionInput": {
          "evmAttendeeReply": "Accepted"
        }
      },
      "txtContent": "Accept",
      "style": {
        "border": "none",
        "padding": "6px 10px",
        "borderRadius": "4px",
        "cursor": "pointer",
        "background-color": "=if([$evmAttendeeReply] == 'Accepted', '#107c10', '#e6f4ea')",
        "color": "=if([$evmAttendeeReply] == 'Accepted', 'white', '#107c10')",
        "font-weight": "=if([$evmAttendeeReply] == 'Accepted', '600', '500')"
      },
      "attributes": {
        "title": "Set reply to Accepted",
        "aria-label": "Accept"
      }
    },
    {
      "elmType": "button",
      "customRowAction": {
        "action": "setValue",
        "actionInput": {
          "evmAttendeeReply": "Tentative"
        }
      },
      "txtContent": "Tentative",
      "style": {
        "border": "none",
        "padding": "6px 10px",
        "borderRadius": "4px",
        "cursor": "pointer",
        "background-color": "=if([$evmAttendeeReply] == 'Tentative', '#986f0b', '#fff7d1')",
        "color": "=if([$evmAttendeeReply] == 'Tentative', 'white', '#986f0b')",
        "font-weight": "=if([$evmAttendeeReply] == 'Tentative', '600', '500')"
      },
      "attributes": {
        "title": "Set reply to Tentative",
        "aria-label": "Tentative"
      }
    },
    {
      "elmType": "button",
      "customRowAction": {
        "action": "setValue",
        "actionInput": {
          "evmAttendeeReply": "Declined"
        }
      },
      "txtContent": "Decline",
      "style": {
        "border": "none",
        "padding": "6px 10px",
        "borderRadius": "4px",
        "cursor": "pointer",
        "background-color": "=if([$evmAttendeeReply] == 'Declined', '#a80000', '#fde7e9')",
        "color": "=if([$evmAttendeeReply] == 'Declined', 'white', '#a4262c')",
        "font-weight": "=if([$evmAttendeeReply] == 'Declined', '600', '500')"
      },
      "attributes": {
        "title": "Set reply to Declined",
        "aria-label": "Decline"
      }
    }
  ]
}
What this JSON does
Displays three buttons: Accept, Tentative, and Decline.
Updates the evmAttendeeReply field when a user clicks a button.
Highlights the currently selected choice through conditional styling.
3. Display the RSVP view to users
There are several ways to make the RSVP functionality visible and easy for attendees to use:
Option A: Add the view to site navigation
Create a dedicated view filtered for Enrolled user = [Me]
Add this view link to the left navigation or site menu.
Option B: Add to the For Attendees page
Insert a link or button directing users to the RSVP view.
Option C: Use the SharePoint List Web Part
Add the List web part to any page.
Configure it to show the custom RSVP view.
Users can update their reply without leaving the page.
Summary
By adding a single text column and applying JSON formatting, you can enable a clean and user-friendly interface for attendees to update their RSVP status directly within the Enrollment list.