Applies to Event Management
For Organizers
As on organizer you can schedule various events, directly or based on a topic, you can view and manage enrollments per event, topic, user or across all events on the website.

Schedule an event
If you want to create a new event, click on + New Event.
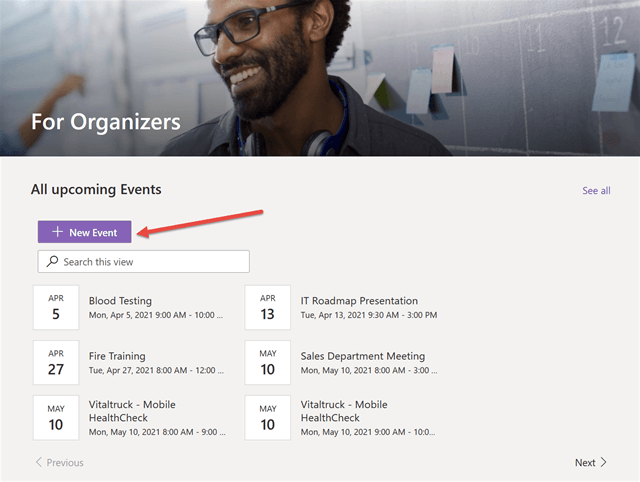
This opens the form that you can use to create a new event.
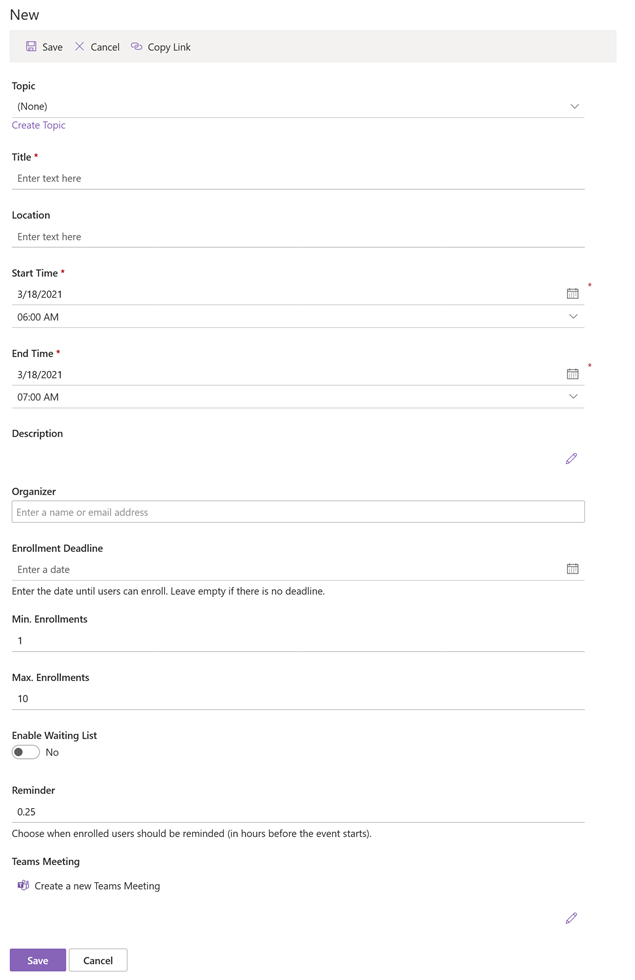
You can create an event without selecting a topic or you can select from a list of topics that
are already added to this website. If you want to add a new topic, click on Create
Topic.
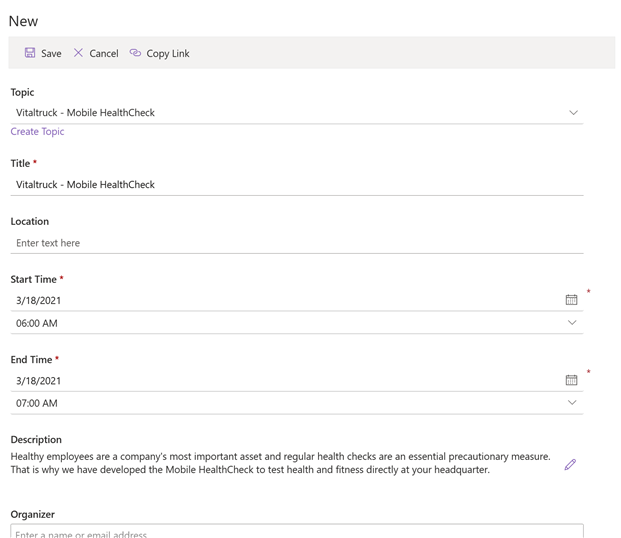
After creating a new topic or selecting an existing one, click on Apply.

This will fill form fields automatically with the values specified in the topic. Learn
more about topics below.
In the form you can now enter the location, start- and end time, change the description, enter
organizers, an enrollment deadline, enter minimum and maximum enrollments,
enable the waiting list, configure a reminder, and create a Teams meeting
automatically if you want to create the event as an online event.
Finally, click on Save to create the new event. If configured, the specified organizers
will receive an email invitation automatically.
Edit Event/Topic Form
It is very easy to modify and adapt the Event or Topic Form to your needs.
Watch this video and check the article How-to: Editing forms for events, topics, courses, etc.,to see how it works in details.

Update events
If you want to change an event, click on the event and then on Edit.
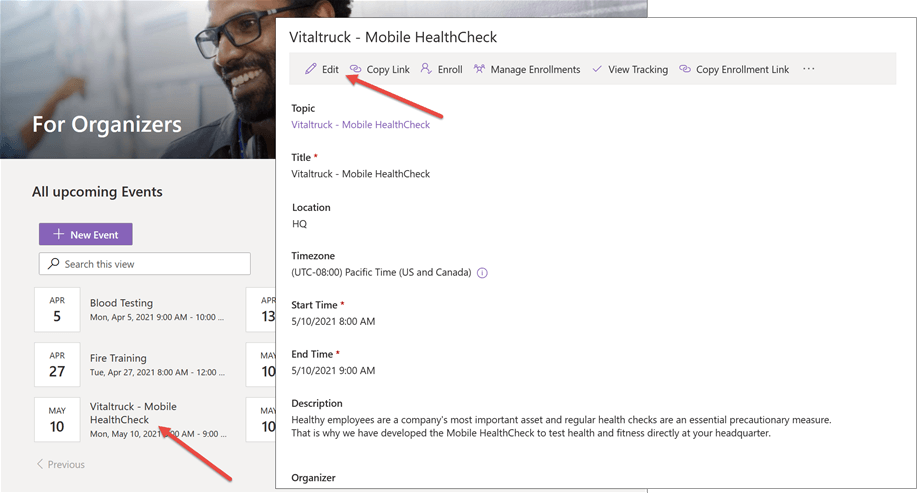
Please note that already enrolled users and organizers will receive a calendar update if you change the event title, location, start-, end time, or any columns that is part of the invitation email.
Draft, Active and Cancelled Status
It is also possible to use different Status (Draft, Active, Cancelled) while scheduling an event. For this, see our article on How to create events in draft mode & cancel events and enrollments
Create a Teams meeting
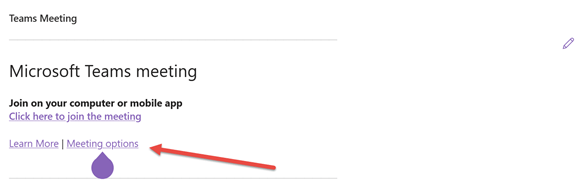
If you want to create the event as a Teams meeting, click on Create a new Teams Meeting in the event form.

The organizer of the Teams meeting will always be the user that created the event in SharePoint. The organizers entered in the event form will be configured as co-organizer in the Teams meeting. Once the Teams meeting is created, you can click on Meeting options to modify the default settings.

If you want to read in more details about the Teams meeting option, check our article on How to: Create a Microsoft Teams meeting in SharePoint
Once the Teams meeting is created, you can click on Meeting options to configure who can bypass the lobby, who can present, etc.
Copy events
If you want to copy existing events, open the event, and click on Copy Event.

This will open the new event form with the same values as the original event, except the Teams meeting. If you want to set it up as a Teams meeting, you have to create a new one for the copied event, by clicking on Create a new Teams Meeting.
Create a topic
You can create topics in the event catalog to:
- Allow users to add topics to their wish list (Demand-driven scheduling).
This means that you can share topics with end users and allow them to add topics to their wish list if they are interested. You can view how many users are interested in the event catalog, and based on this information, start scheduling events. Organizers can enroll interested users automatically if they open an event that has been created based on the topic (Add interested users). - Schedule multiple sessions based on a topic/template. All the information entered in the
event catalog can be reused if organizers schedule an event based on the topic/template from the event catalog. - Manage Enrollments across all events scheduled based on a topic. Organizers can open the topic and click on Manage Enrollments to view enrollments in all events that are based on the topic.
If you want to create a new topic, click on + New in the All Topics section.
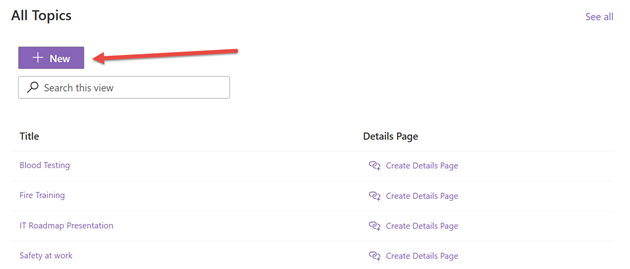
Enter the required information and click Save.
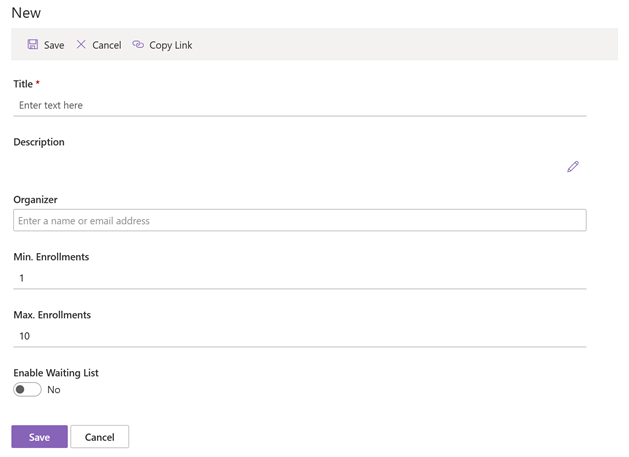
Please note that the columns Min. Enrollments, Max. Enrollments and Enable Waiting List are the default values for events you schedule based on this topic. If you allow users to add topics to their wish list, there is no limitation on the number of enrollments and therefore no waiting list.
If you want to prevent users from enrolling in multiple events covering the same topic, read our article How to: Prevent users from enrolling in more than one event.
Add interested users
If an event is assigned to a topic, it is possible to add users to the event that have registered an interest in the topic (Add to Wishlist).
You can either click on Add all to add all these users to the event, or you can click on the number of users to view the users interested in the event, select them, and click on Add Selected User(s) to enroll them in the event.
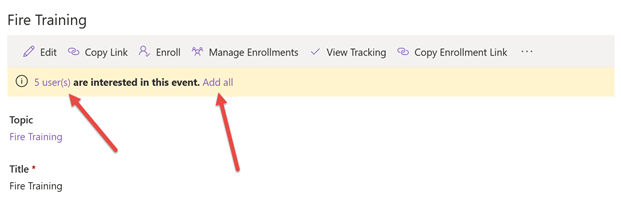
To only add specific users to the event, select the users you wish to add and click on Add
Selected User(s).

Enroll multiple users or groups
If you want to enroll multiple users or groups to an event, open the event and click on Enroll.
By default, your user account will show up in the enrollment form. However, if you want to enroll other users, remove your user, and enter other users or groups.
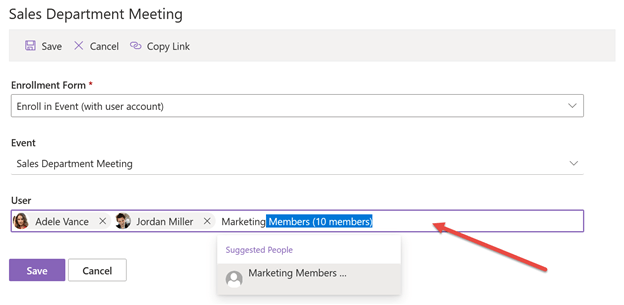
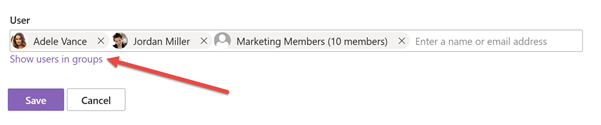
You can enter SharePoint groups, Microsoft 365 groups, Teams or Distribution Lists. If you enter a group with a lot of users, it may take a while to resolve the members. Once they are resolved, you can click on Save to complete the enrollment or click on View users in groups to display all the users in case you want to review all the members.
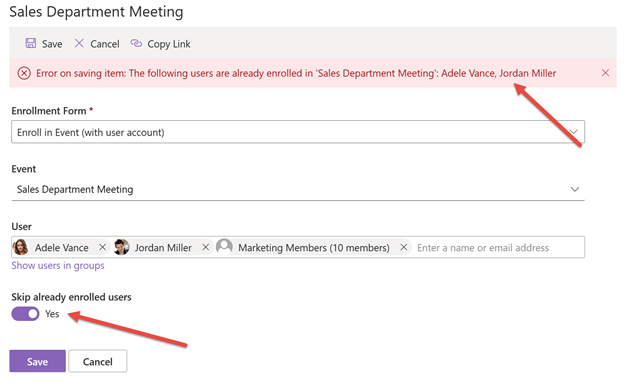
If some of the users are already enrolled, you will see a message at the top and you can then enable Skip already enrolled users to enroll the remaining users.
All the newly enrolled users will receive an email invitation. You can check how to allow this option in our article: How-to: enroll Microsoft 365 groups and distribution lists .
Enroll external users
If you want to enroll external users or employees without an Microsoft 365 account, select the enrollment form Enroll in Event (with e-mail address – for external users).
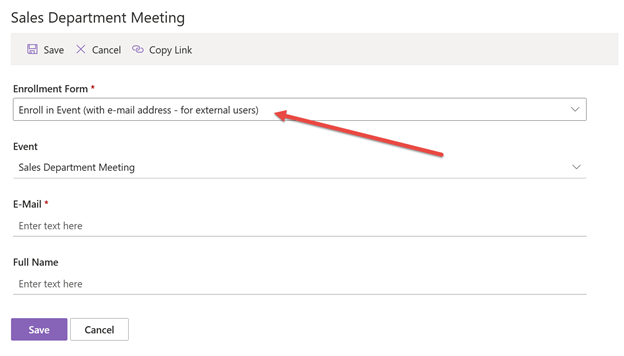
Enter the user’s email address and name and click on Save to complete the enrollment. External users will also receive a calendar invitation via email.
Read our dedicated article on how to enroll external users for more information.
Copy the enrollment link
You can copy the enrollment link to promote specific events, share it with users via e-mail or post it on Yammer, Microsoft Teams, on other SharePoint pages, or anywhere else.
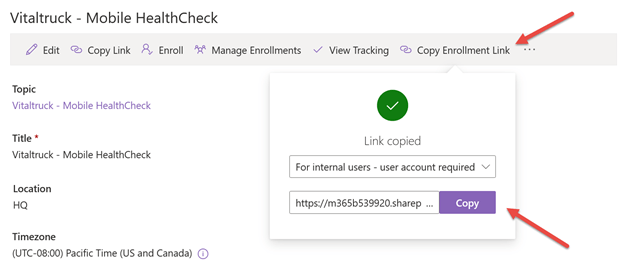
If users click on the link, the enrollment form will show up automatically.
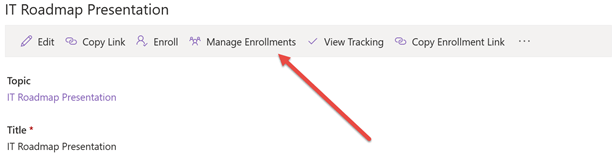
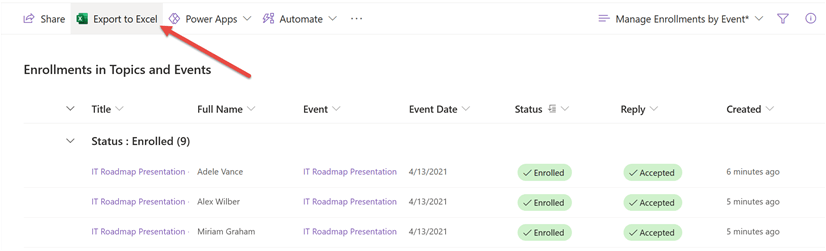
Manage Enrollments
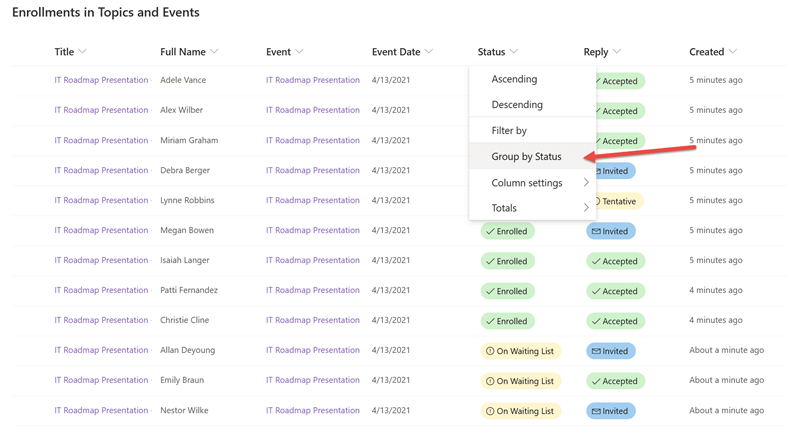
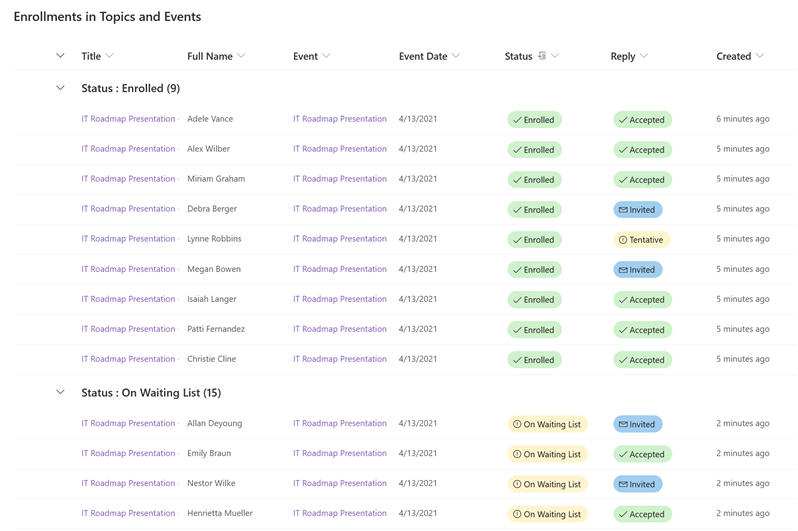
Select a topic or an event and click on Manage Enrollments to view the users enrolled, on the waiting list, on the wish list, etc.
In this view you can sort, filter or group by status, event date, user or any other column that is available in the view.
If you want to export the enrollments, use Export to Excel.
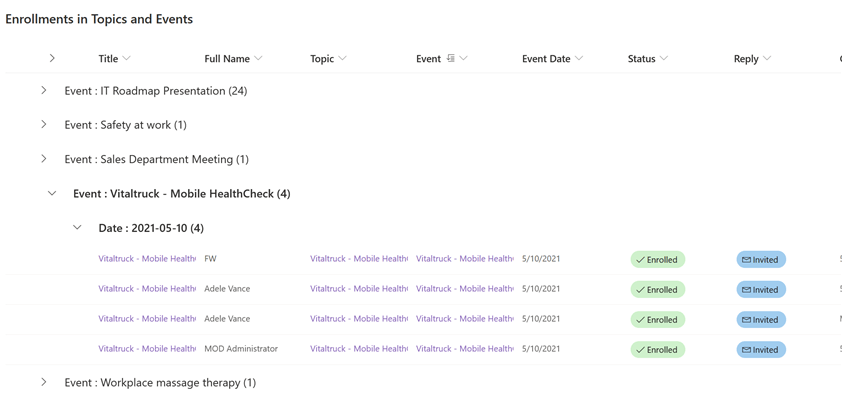
If you want to view the enrollments across all topics and events, open the view All Enrollments in the For Organizer section. Here you can view all enrollments in this website. Use all the grouping, filter, and sort options to create the views you need for your reports.
Manage Waiting Lists
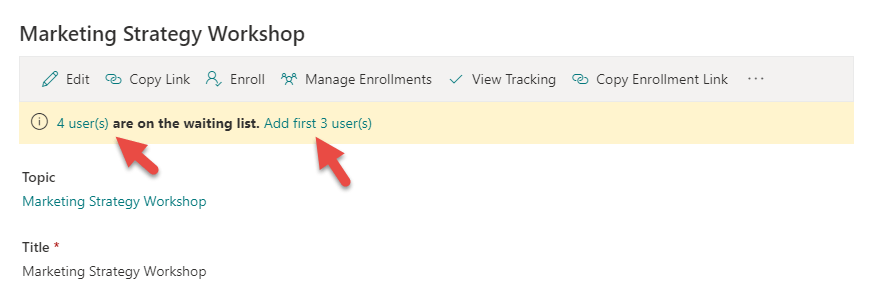
If you want to view the waitlisted users for a specific event, open the event and click on Manage Enrollments. Now you can filter or group by Status to only show users on
the waiting list.
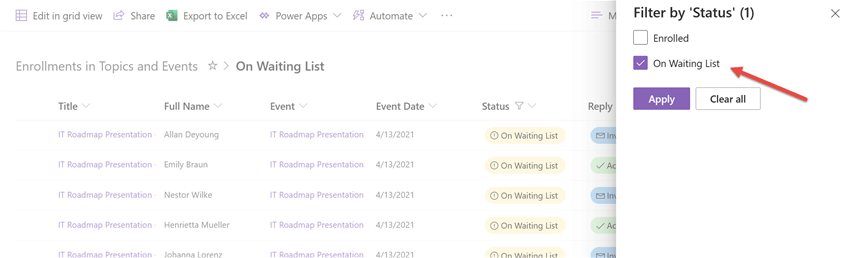
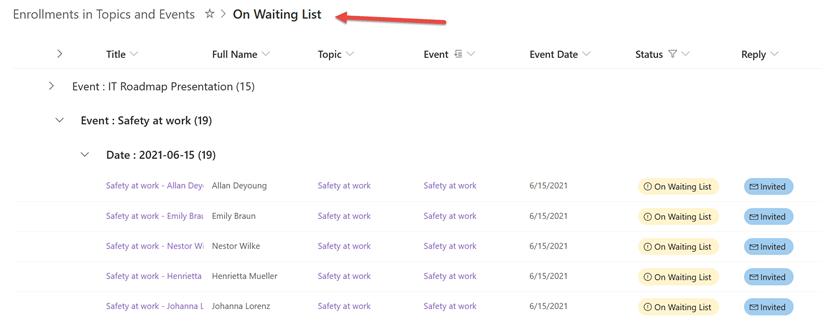
If you want to view all users on the waiting list across all events, open the All Enrollments view and filter by Status is equal to On Waiting List.
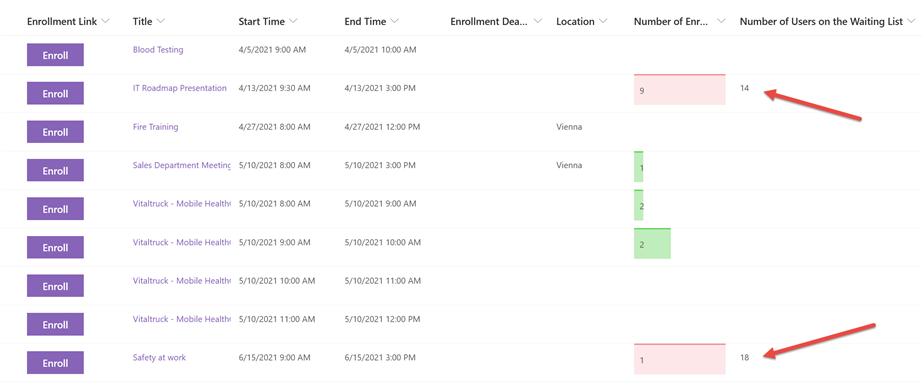
Alternatively, you can add the column Number of Users on the Waiting List to the upcoming events view to see how many users are added to the waiting list per event.
If you increase the Max. Enrollments value, this will not automatically enroll users from the waiting list, but if you open the event after increasing Max. Enrollments, you can enroll the first users from the waiting list or select specific users and enroll them.
Send e-mails to attendees, organizers, and other users
For more insights on this feature, check this article: Send additional e-mail notifications manually and create reusable email templates and the video below:
Other features
This guide offers a foundational overview of our Employee Training Management app. While we’ve covered the basics here, remember that our tool is designed for expansion and customization. You can easily add new features, views, and reports or set up workflows for management approval and notifications. This is made simpler with SharePoint’s out-of-the-box features, Power Automate, or other apps within Microsoft 365. Dive deeper into our ‘How-to‘ section for insights on specific app features and customizations.
If you have particular requirements or seek guidance on configuring the solution, don’t hesitate to email us at support@sharepointsapiens.com. We’re here to assist.