Applies to Event Management & Employee Training Management
Creating Informational Events Without Registrations in SharePoint Event Management
Overview
Our SharePoint‑based Event Management solution allows organizers to publish events that users can register for. Registered users automatically receive a calendar invitation in Outlook and can RSVP.
In some scenarios, customers require informational events—events that are visible to users but do not allow enrollments or registrations. Typical examples include announcements, public holidays, or internal information sessions where attendance tracking is not required.
This article explains two supported approaches to create informational events using the same Event list in SharePoint.
Option 1: Disable Enrollments Using the “Enable Enrollments” Column (Simple)
This option is the fastest and easiest way to create an informational event.
How It Works
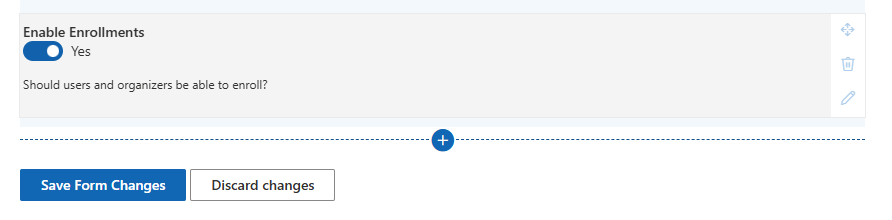
The Event list includes a default Yes/No column called Enable Enrollments. When this column is set to No, users will not be able to enroll in the event.
Configuration Steps
-
Open the Event list in SharePoint.
-
Click on New to create a new event
-
If the Enable Enrollments columns is not visible in the form
-
Click on Edit form at the top right
-
Click on the + icon at the bottom and add the column Enable Enrollments to the form
-
Save the changes and apply them for all items
-
Learn more about how to edit forms here: https://www.sharepointsapiens.com/help/documentation/edit-form/
-
-
When creating an informational event:
-
Set Enable Enrollments = No
-
-
Save the event.
Result
-
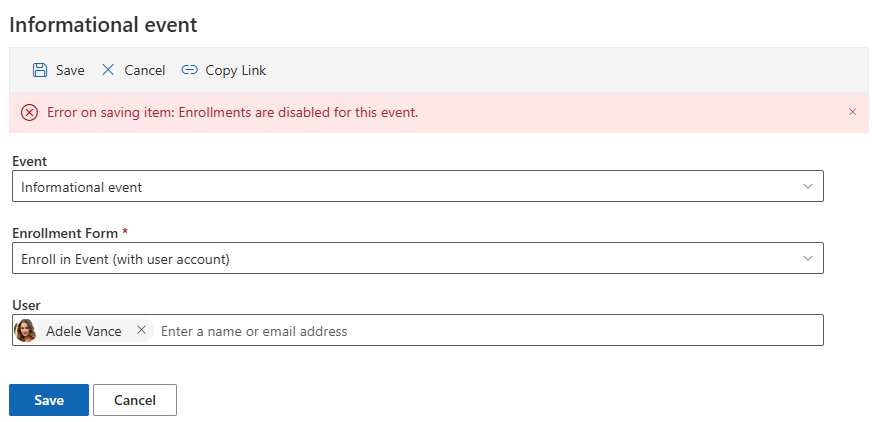
The event is displayed to users.
-
When users try to enroll, they’ll see a message that enrollments are disabled.
When to Use This Option
-
You only need occasional informational events
-
You do not need different forms or layouts
-
You want minimal configuration effort
Option 2: Use Separate Content Types (Recommended for Clear Separation)
This option provides a clean separation between events with registrations and events without registrations. It requires more configuration but offers better structure and flexibility.
Concept
The Event list contains a default content type named EVMEvent, which supports enrollments.
To create informational events:
-
Add a second content type based on the standard Item content type
-
This new content type does not support enrollments
-
Users select the desired event type when creating a new event
Step 1: Review Default Content Type
By default, the Event list includes:
-
EVMEvent – used for events with registrations enabled
You may optionally rename:
-
EVMEvent → Event with Registrations Enabled (or similar)
Other suggested names:
-
Registration Event
-
Bookable Event
-
Event with Enrollment
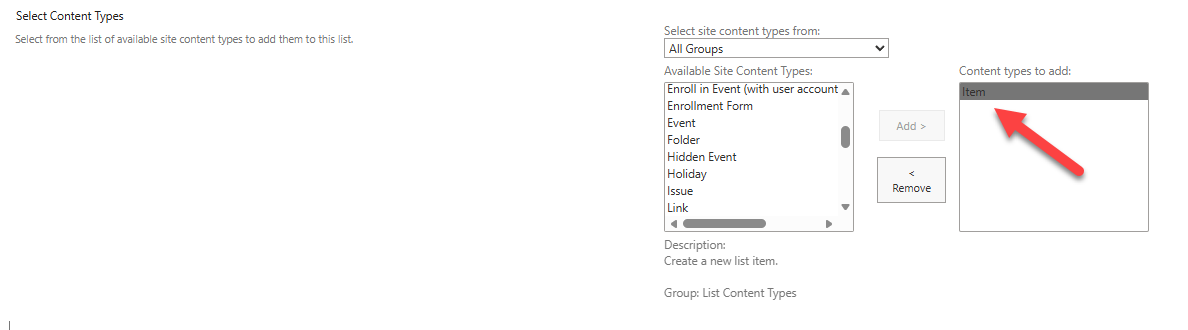
Step 2: Add a New Content Type for Informational Events
-
Go to List Settings of the Event list
-
Enable Allow management of content types
-
Add a new content type:
-
Use the content type: Item
-
-
Rename the content type, for example:
-
Informational Event
-
Event without Registrations
-
Announcement Event
-
-
Add the required columns to this content type, such as:
-
Title
-
Location
-
Start Time
-
End Time
-
Step 3: Event Creation Experience
Once both content types are available:
-
When users create a new event, they select the Content Type from a dropdown. If the dropdown is not available, edit the form, click on the + icon at the bottom and select the column Content Type. Now move it up to the top of the form.

-
Depending on the selected content type:
-
EVMEvent: Enroll, Manage Enrollments, RSVP features are available
-
Informational Event (Item‑based): No enrollment options are shown
-
Important: Configure Event Details Pages
Each event content type has its own details page layout.
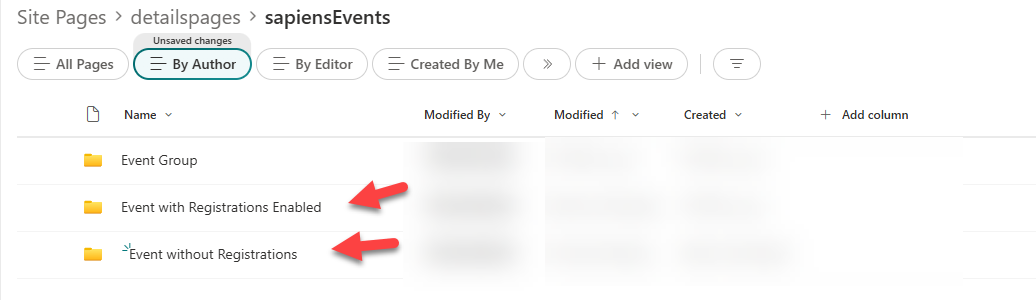
Folder Structure
In the Site Pages library:
Site Pages
└── detailspages
    └── sapiensEvents
        ├── EVMEvent
        │   └── default.aspx
        └── <OtherContentType>
            └── default.aspx
⚠ Critical Requirement
Each content type must have a matching subfolder, and the folder name must match the content type name exactly.
Step 4: Adjust Folders for Renamed or New Content Types
-
If you renamed EVMEvent:
-
Rename the existing
EVMEventfolder to match the new content type name exactly
-
-
For the new Item‑based informational content type:
-
Copy an existing folder
-
Rename the copy to the name of the new content type
-
Step 5: Customize the Informational Event Page
-
Open the
default.aspxpage inside the new content type folder -
Edit the page to match informational requirements
Required changes:
-
Remove the Enroll button
-
Remove all enrollment‑related sections
-
Display only relevant fields, for example:
-
Title
-
Location
-
Start Date
-
End Date
-
This default.aspx page defines what users see when they click an informational event.
Summary: Which Option Should I Choose?
| Scenario | Recommended Option |
|---|---|
| Quick setup, minimal changes | Option 1 – Enable Enrollments = No |
| Clear separation of event types | Option 2 – Separate Content Types |
| Different layouts for events | Option 2 |
| Long‑term scalability | Option 2 |
Best Practice Recommendation
-
Use Option 1 for simple, occasional informational events.
-
Use Option 2 when informational events are a core requirement and need:
-
Different forms
-
Different details pages
-
Clear distinction for event organizers
-
If you need assistance configuring content types or customizing the event details pages, contact your SharePoint administrator or support team or reach out to us if you are interested in a premium support package.