Applies to Event Management & Employee Training Management
How do I configure E-Mail settings in SharePoint Online with a user account?
How do I configure E-Mail settings in SharePoint Online with a user account?
You want to learn how to configure E-Mail settings in SharePoint online with a user account and use this mailbox to send and handle emails in Event Management or Employee Training Management? Follow our easy step-by-step guide to successfully configure the user account.
Choose the right Option to configure E-mail settings in SharePoint Online with a user account?
In Event Management and Employee Training Managment on SharePoint online you must configure the E-Mail settings to send RSVP meeting invites and receive status replies. To configure E-Mail in SharePoint online with a user account, choose the third option- Send invitations, handle status replies, check availability and book resources. This option lets you authorize a user account.

However, before you can do this, you have to create the user account. Also read why we recommend to use a user account instead of a shared mailbox here: https://www.sharepointsapiens.com/help/documentation/exchange-mailbox-use-a-user-mailbox-instead-of-a-shared-mailbox/
Create a user account
Please note that during the trial you can also use your own account. In production, please use a designated user account.
Open the Microsoft 365 Admin Portal – https://www.microsoft365.com, open Active users and click on Add a user.
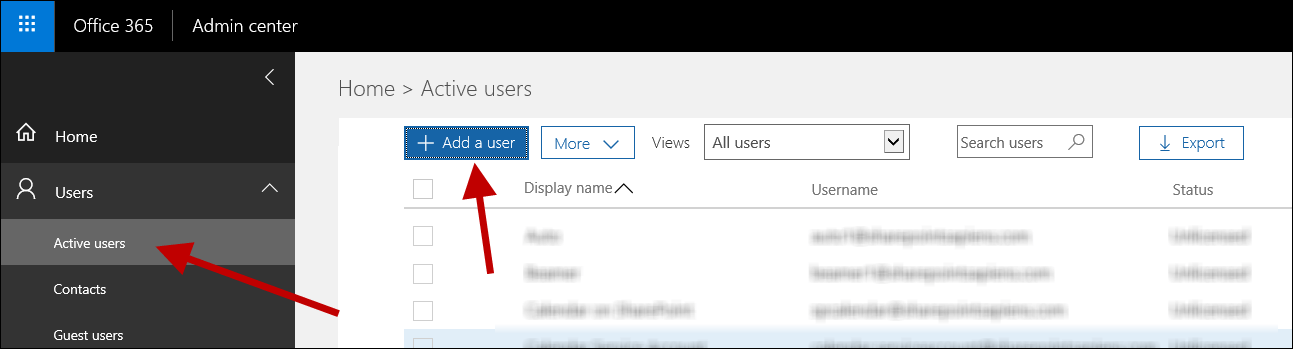
Enter the display and user name, create the password and make sure the option Make this user change their password when they first sign in is not active.
Also select a Microsoft 365 license for this user.

Now you can enter the email address of this user account and click on Authorize in the app settings.

You now have to enter the accounts password and consent that the account gets access to Microsoft 365 resources.
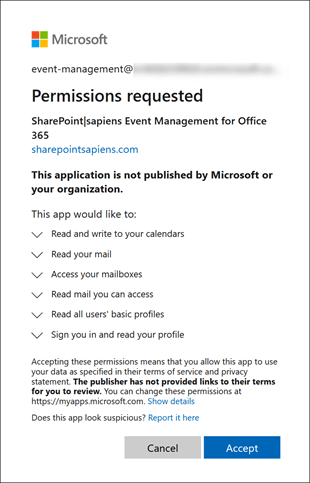
If the consent is successful, you can continue configuring the app and use the user account to send and receive emails.
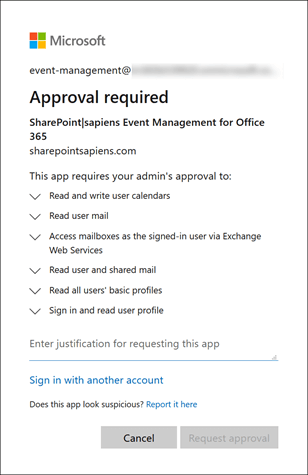
What to do if I need admin approval?
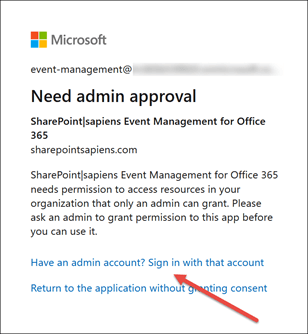
If you receive the following message instead of the consent page, use one of the options below to continue. If the authorization completed successfully, this is not necessary, and you can skip this section and continue configuring the app.
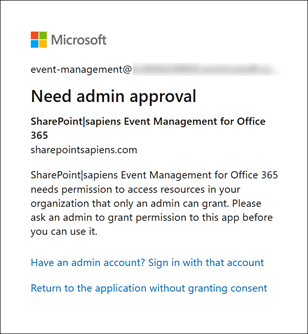
You see this message, because users are not allowed to consent to apps accessing company data on their behalf. This is an option that administrators can configure in Azure Active Directory (Azure Active Directory/Enterprise applications/User Settings).
If this option is set to no, then administrators must consent to these applications before users can use them.
How to solve this?
-
Option 1: Temporarily allow users to consent apps (recommended)
-
Option 2: Consent on behalf of your organization as an administrator
-
Option 3: Enable admin consent requests
Option 1: Temporarily allow users to consent apps (recommended)
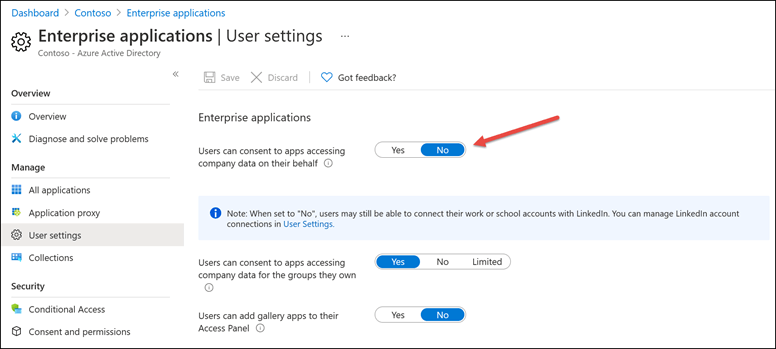
Use the Azure Active Directory Admin Center to allow users to register applications.
-
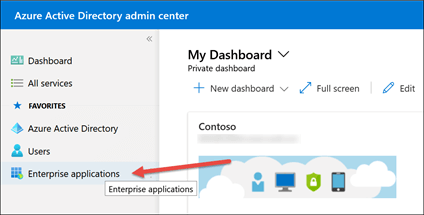
Log in to the Azure Active Directory admin center.
-
Click on Enterprise Applications
-
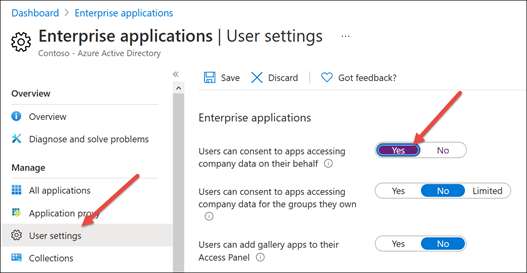
Go to User settings and under Enterprise applications select Yes.
-
Click on Save.
It can take a few minutes to fully apply the changes. Wait a few minutes, go back to the app settings, click on Authorize and enter the account’s credentials.
That’s it. You can now continue configuring the app and use the user account to send and receive emails.
Don’t forget to change the Enterprise applications option back to No in the Azure Active Directory admin center, if you want to prevent users from consenting other apps in the future.
Option 2: Consent on behalf of your organization as an administrator
On the consent screen, click on Have an admin account? Sign in with that user
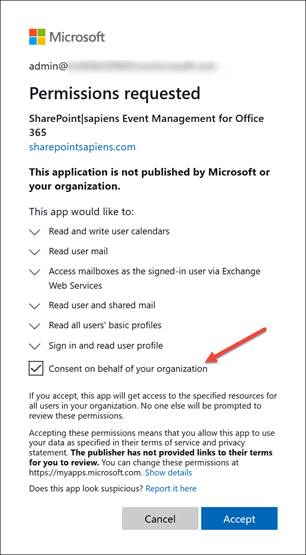
Select Consent on behalf of your organization and click on Accept.
Go back to the app settings, click on Authorize and enter the account’s credentials.
That’s it. You can now continue configuring the app and use the user account to send and receive emails.
Option 3: Enable admin consent requests
You can configure the admin consent workflow in the Azure Active Directory Admin Center as discussed in this Microsoft article. The admin consent workflow gives administrators a secure way to grant access to applications if user consent is disabled. When a user tries to access an application but is unable to provide consent, they can send a request for admin approval.

After the admin consent workflow is enabled, the user account can request admin approval for the application they’re unauthorized to consent to directly.
The administrator can now review the admin consent requests and approve it. Note that this will grant admin consent to the application.
Once the request is approved, go back to the app settings, click on Authorize and enter the account’s credentials.
That’s it. You can now continue with the app settings and use the user account to send and receive emails.