Applies to Employee Training Management
The Configuration Guide for Employee Training Management on SharePoint online
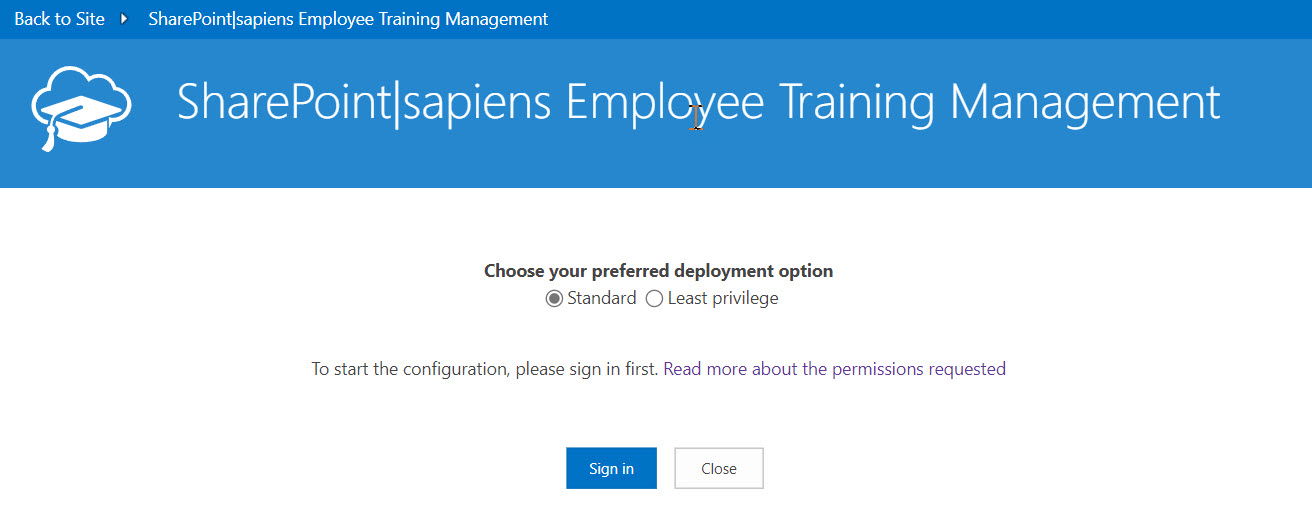
Start the Configuration

Click to start the configuration after you added the app to the site.
You can choose between 2 deployment modes. Standard and Least privilege.
Standard deployment
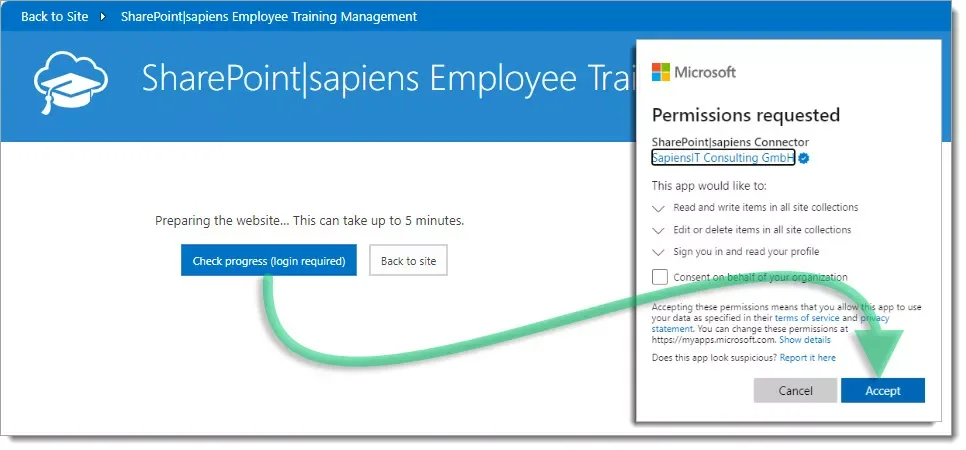
You’ll now have to sign in as a global or application administrator.
After signing-in, please accept the permissions the app requests to do the configuration and to work as expected. We have prepared an article that explains how you can manage the permissions in Entra ID Enterprise Application Permissions and which ones you can remove, after the configuration is complete. Read Entra ID App-Permissions requested by Sapiens Apps to learn more about this topic.
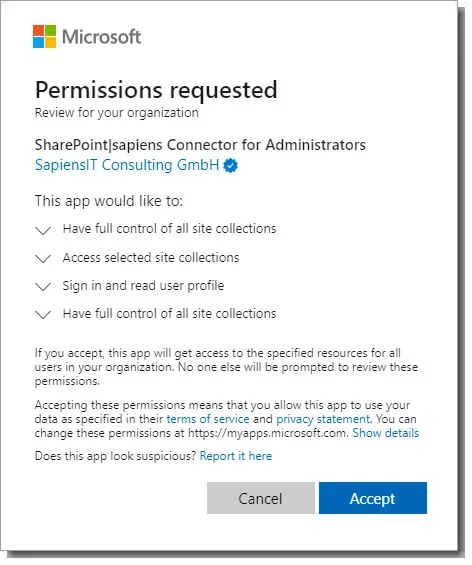
Click on Accept and the initial configuration will begin.
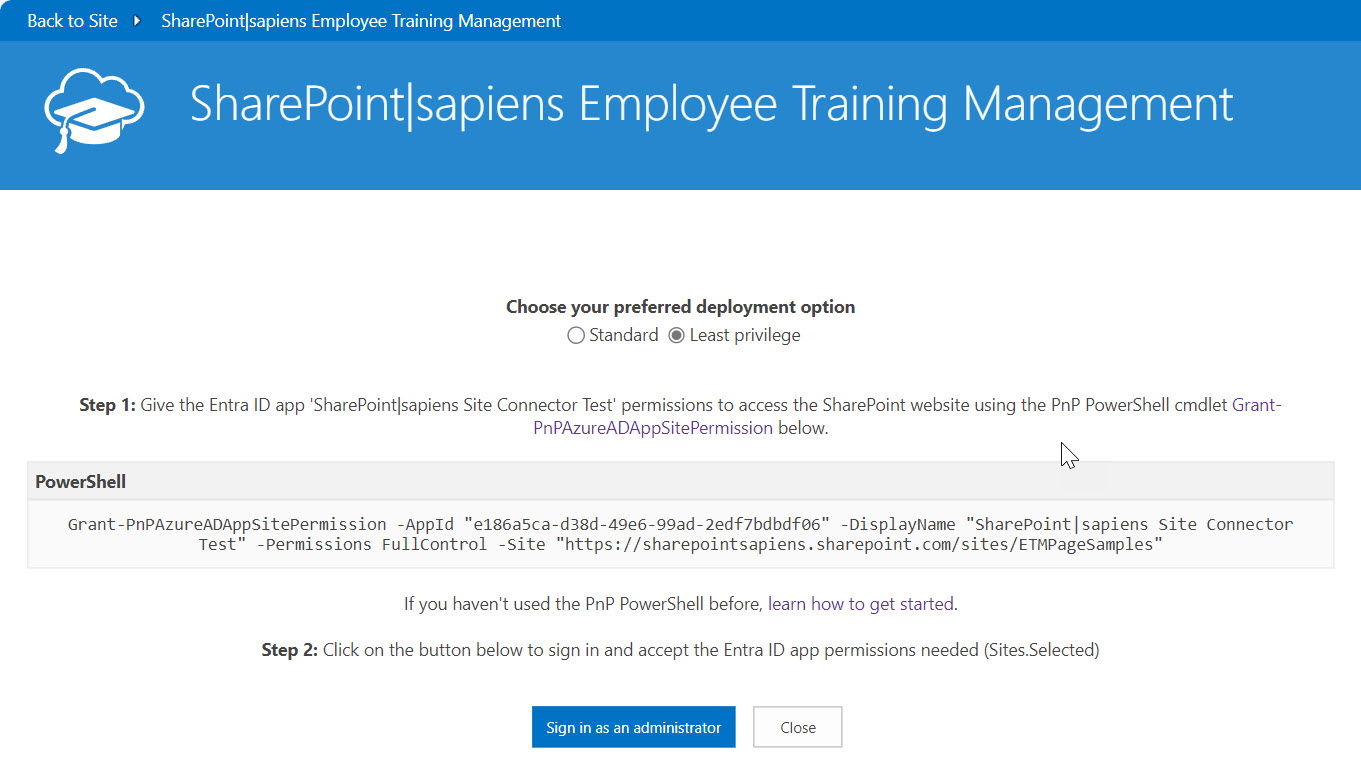
Least privilege deployment
To use this option you first have to use the PnP PowerShell to grant the app permissions on your SharePoint website. Just follow the instructions you see on the screen. Once you have successfully executed the cmdlet, click on the button to sign in as a global or application administrator.
After signing-in, please accept the permissions the app requests to do the configuration.
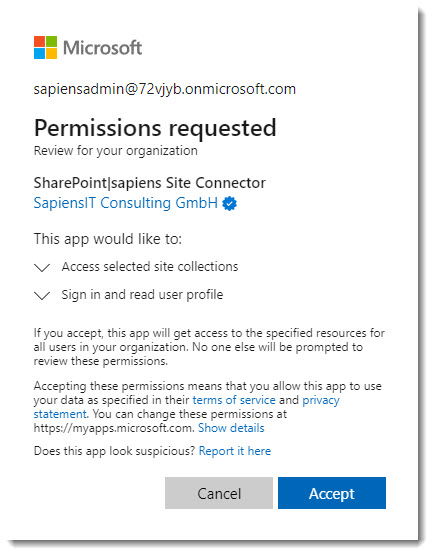
Click on Accept and the initial configuration will begin.
Check deployment progress
If you want to watch the configuration progress click on Check Progress and consent the requested permissions, or navigate back to site and continue the basic configuration later.
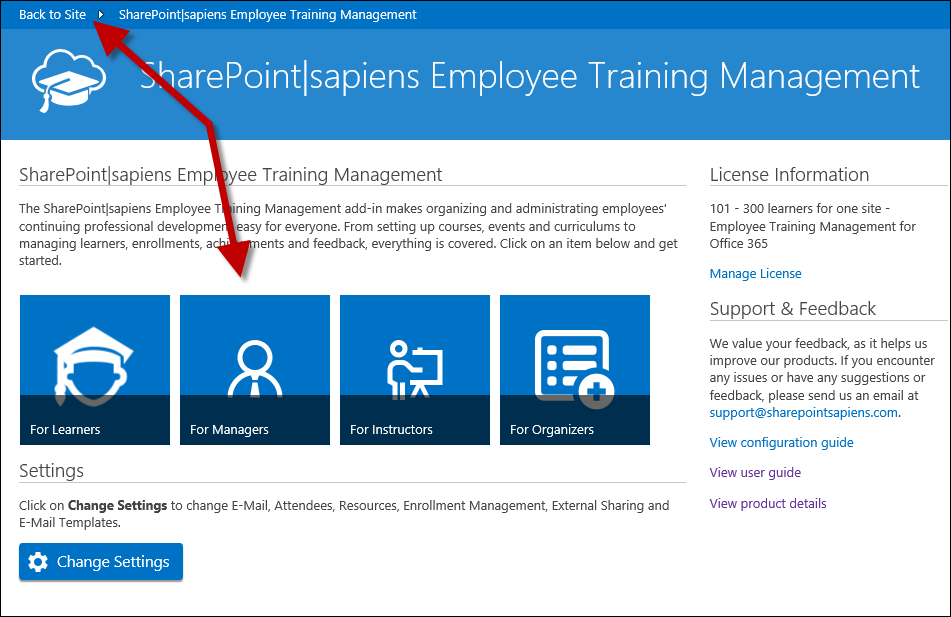
Watch the app preparing the site, this will take up to 5 minutes. Finally you’ll see the app settings screen. Click on Change Settings to configure details like the e-mail service, templates …
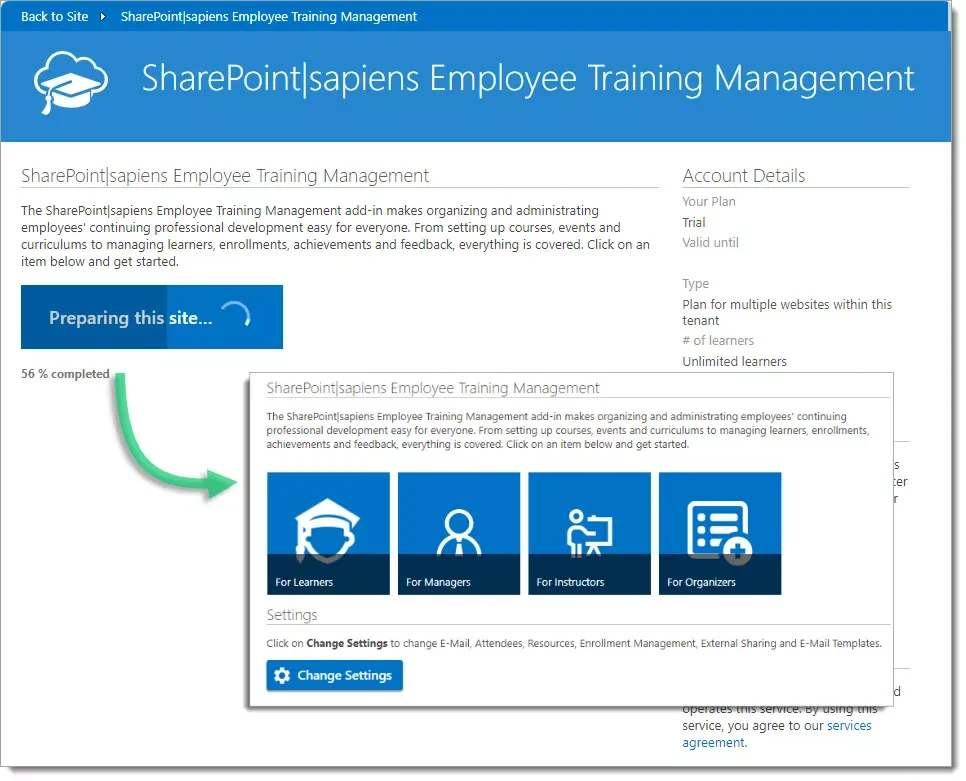
Continue configuring the basic settings.
Basic Settings
Click the Change Settings button.
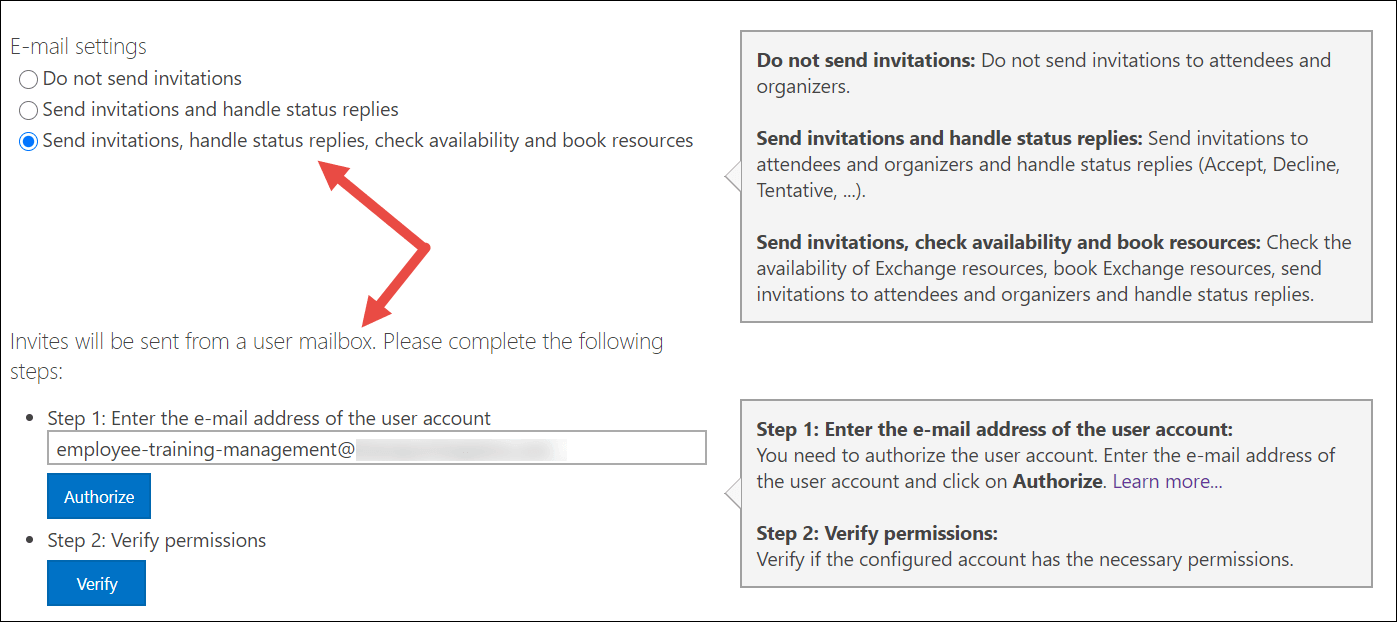
Configure e-Mail Settings
The app sends calendar invites to enrollees via e-mail and it receives status replies, also known as RSVPs. Settings you can use are
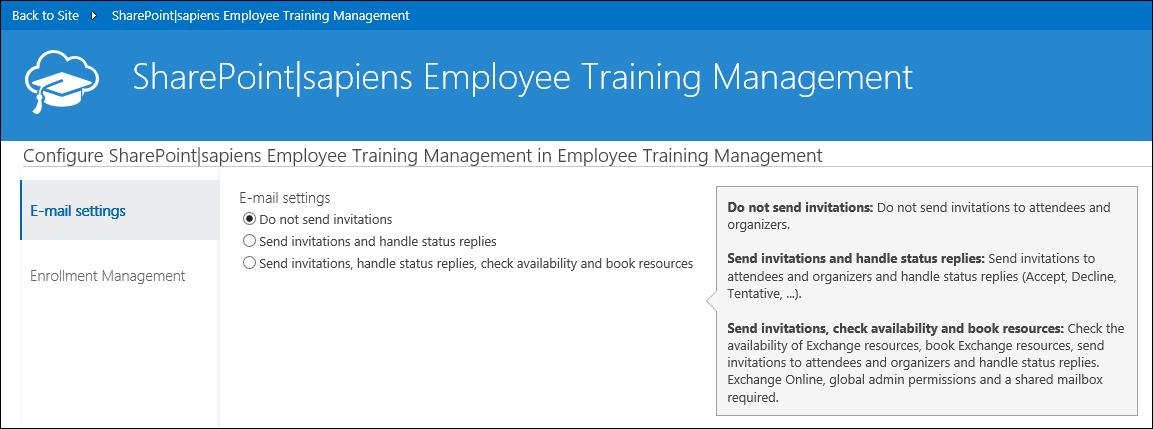
- Do not send invitations: Invitation will not be sent to attendees and organizers
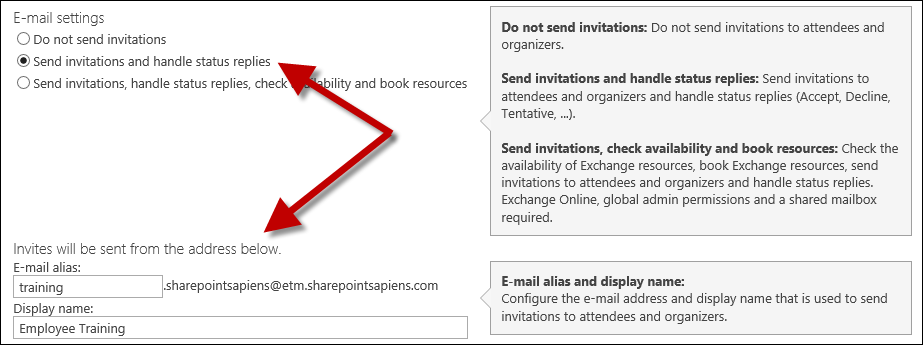
- Send invitations and handle status replies: Invitations will be sent to attendees and organizers. Configure the e-mail alias and display name that is used to send invitations.
- Send invitations, handle status replies, check availability and book resources: This option will also check the availability of Exchange resources, book Exchange resources and send invitations to attendees and organizers. If you use this option, you have to consent that the account gets access to Exchange resources. Learn more about configuring the E-mail settings.
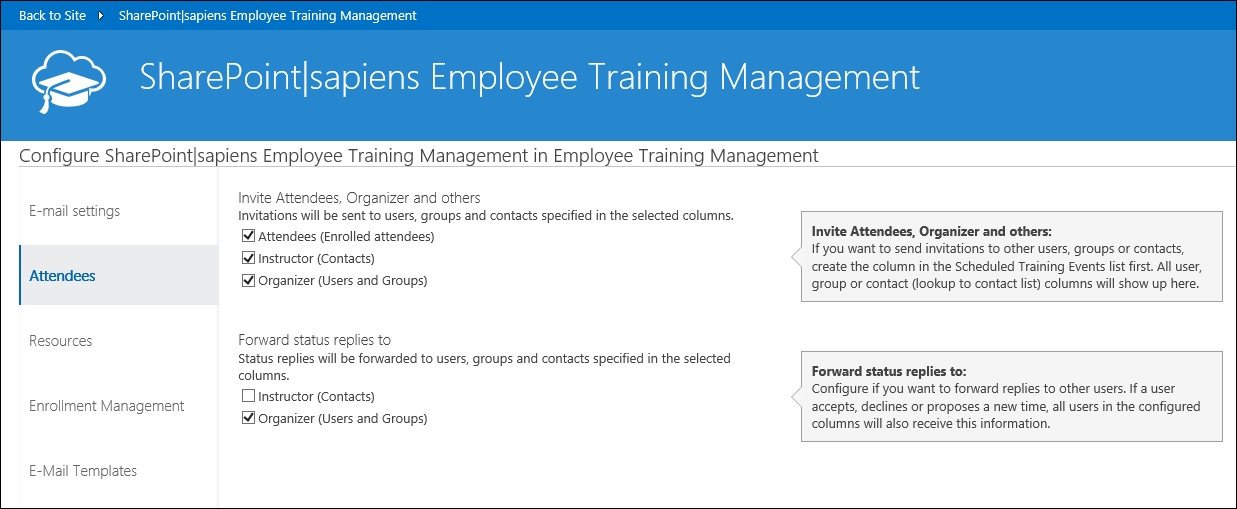
Attendees
Configure if you want to send e-mail invitations to attendees, instructors and organizers. If you want to send invitations to other users, groups or contacts, you have to create the columns in the Scheduled Training Events list first.
You can also configure if you want to forward status replies to the instructor or organizer. Here you can also use different columns, but you have to create them first in the Scheduled Training Events list.
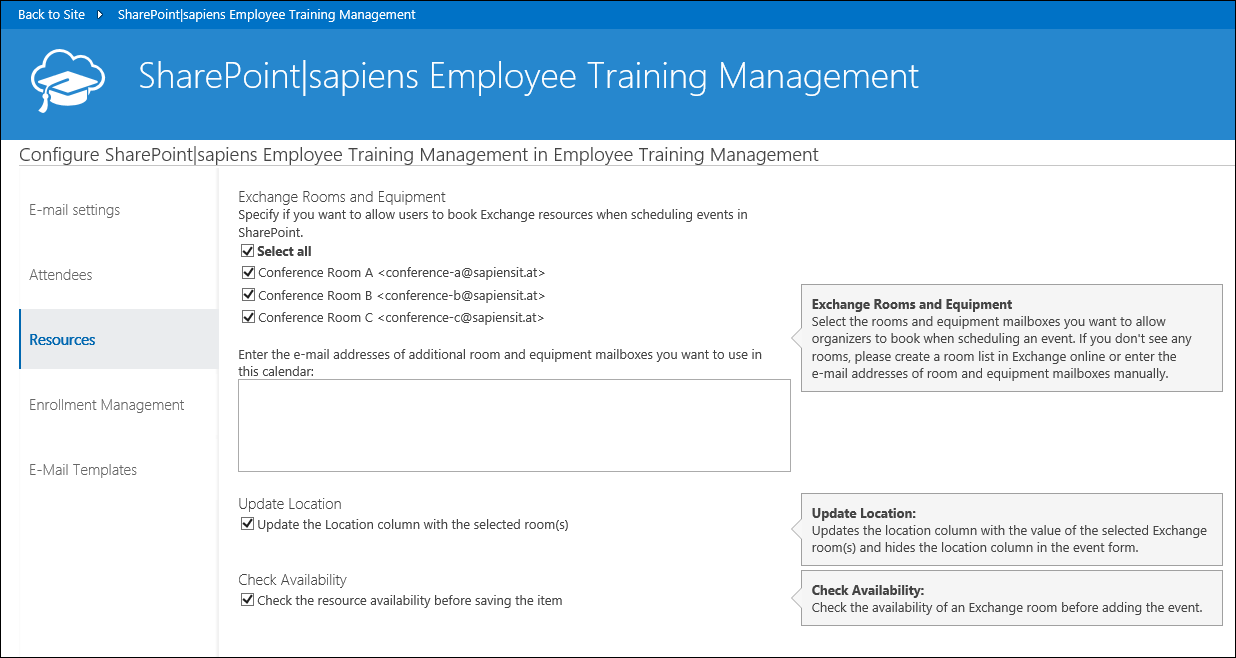
Resources
This section is only available if you use Send invitations, handle status replies, check availability and book resources in the E-mail settings. Select the rooms and equipment mailboxes you want to allow organizers to book when scheduling an event. Also configure if you want to update the location column with the value of the selected Exchange room(s).
You can also configure if you automatically want to check the availability of an Exchange room before adding the event.
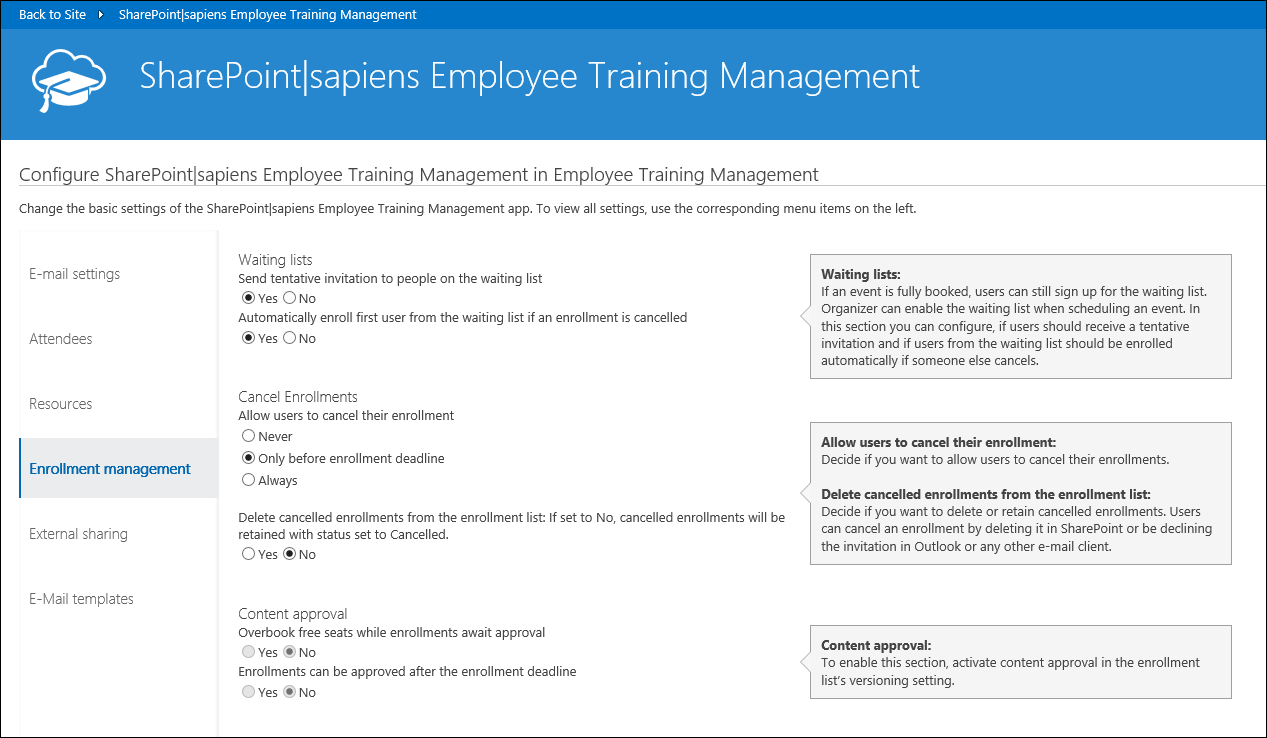
Enrollment Management
Event organizers can decide per event if they want to enable a waiting list. In this section you can configure, if users should receive a tentative invitation and if users from the waiting list should be enrolled automatically if someone cancels.
Here you can also decide if users should be able to cancel enrollments and if you want to delete or retain cancelled enrollments.
If content approval is enabled in the enrollment list, you can decide if you want to allow users to overbook free seats and if enrollments can still be approved after the enrollment deadline.
External Sharing
Organizers can share events when External Sharing is enabled and share anonymous access links with external users. External users can enroll with their e-mail address.
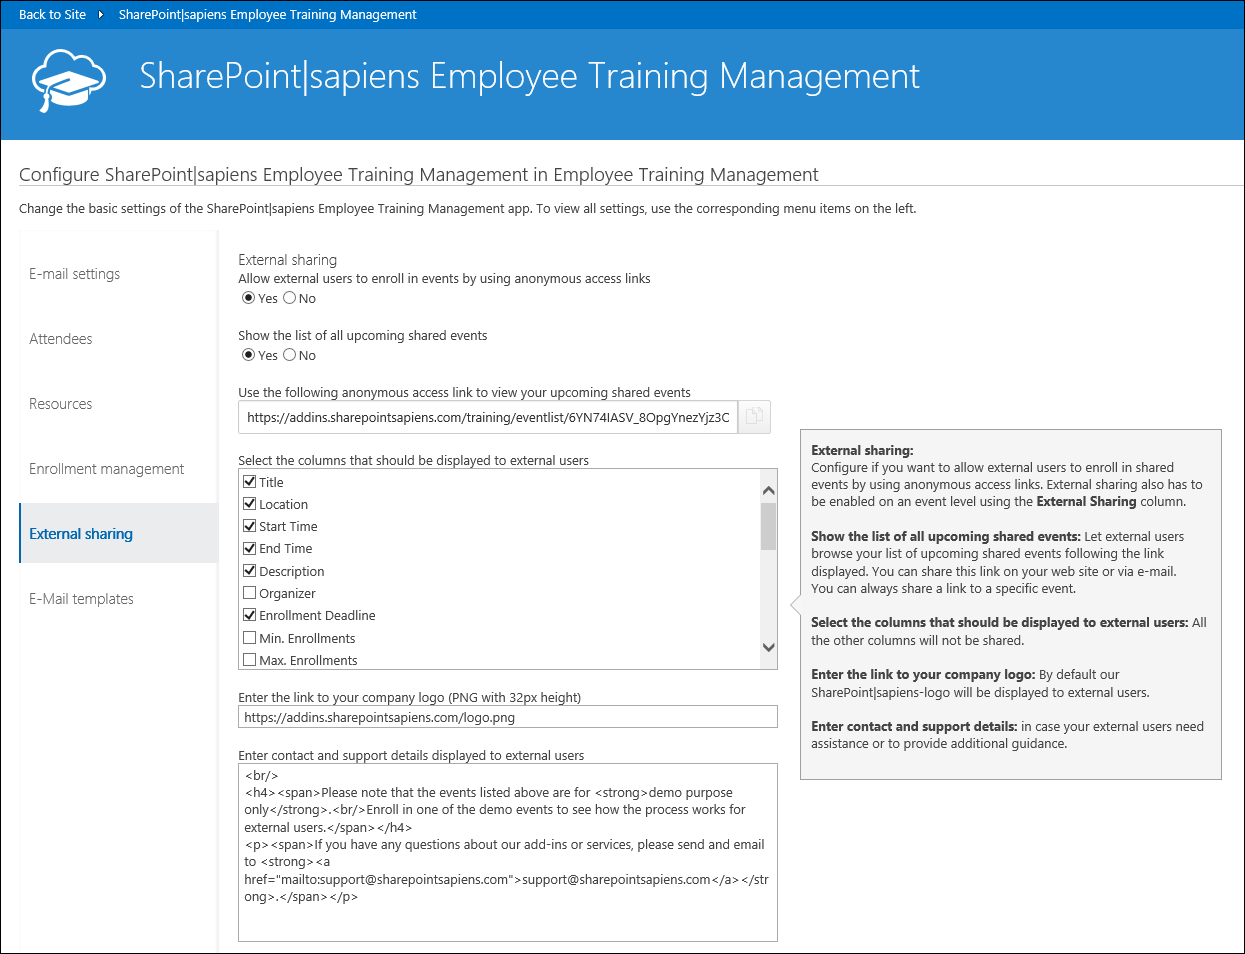
If you want to get more information on how to enable enrollments for external users, read the following useful article How to: Allow external users to enroll in events
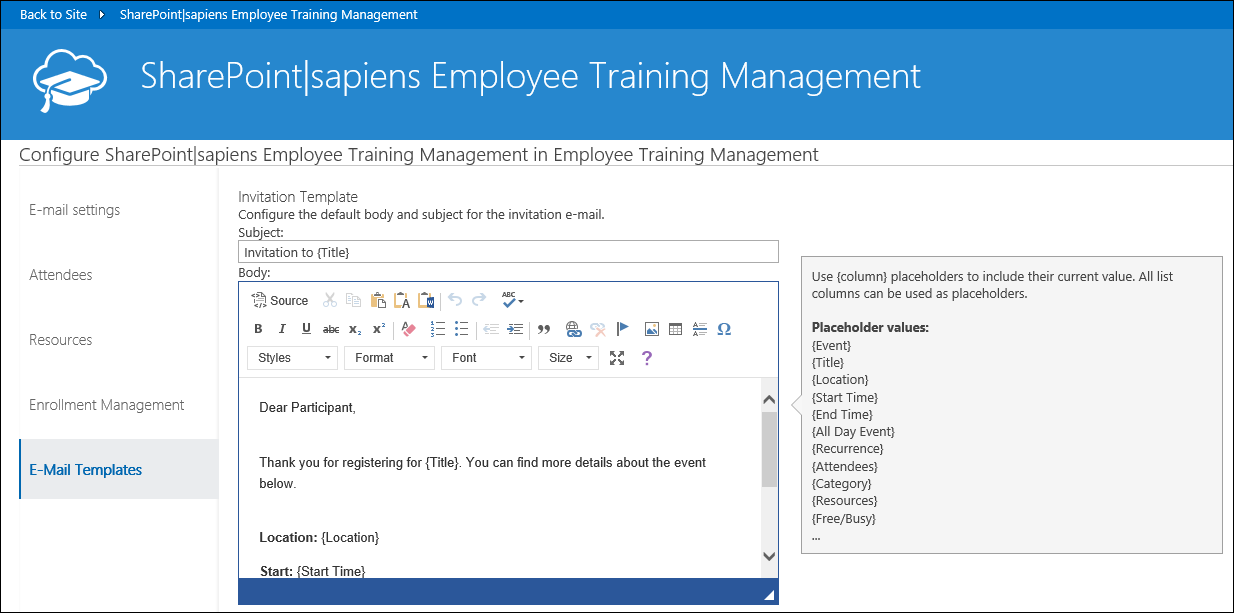
E-Mail Templates
Configure e-mail templates for invitations and cancellations. Use {column} placeholders to include their current value. You can use the column title or the internal column name. E.g. {EventDate} or {Start Time} is the same. You can configure different templates for attendees, users on the waiting list, organizers and other user columns that you have configured in the Attendees section.
Click on Save to save the settings. This can take a few seconds.
You’re done! Congratulations!
To go back to the SharePoint site, click on Back to Site or on one of the items below.
Lists, additional columns, views, pages and permissions
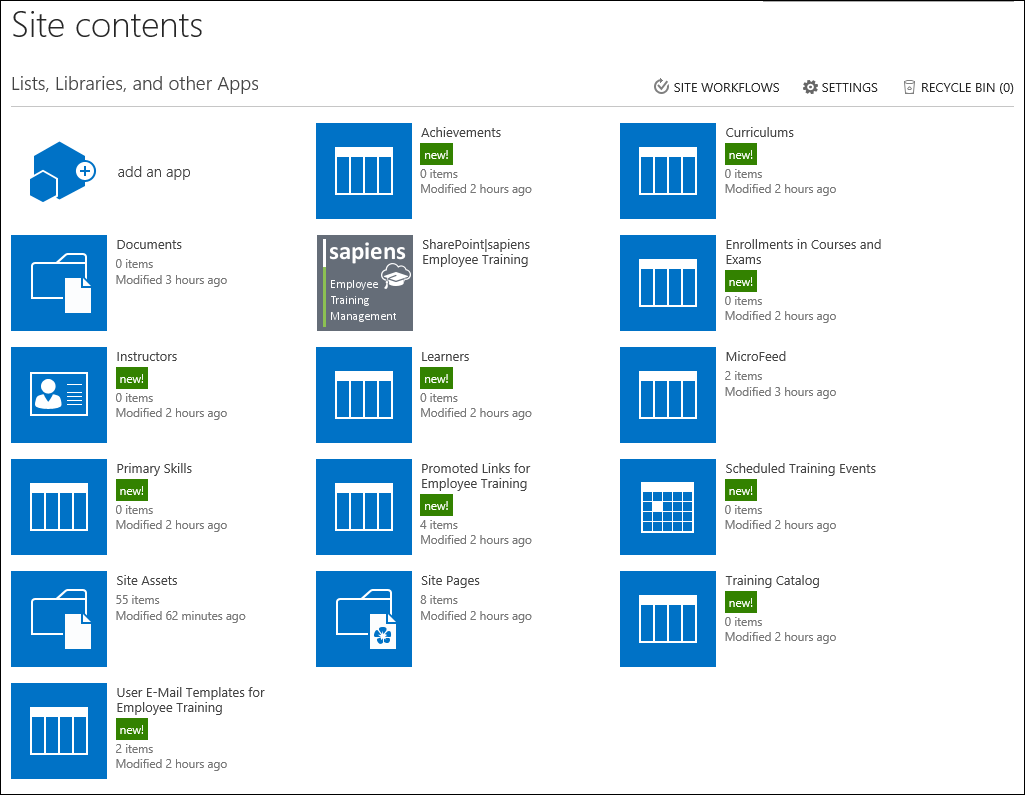
The app created the following lists:
- Training Catalog: Contains instructor-led training and exam templates and self-paced training and online exams.
- Curriculums: Contains curriculums that can be used to bundle courses and exams from the training catalog.
- Scheduled Training Events: Contains the actual training events. You can create Training events directly in this list or based on an instructor-led training or exam template from the training catalog.
- Enrollments in Courses and Exams: Contains all enrollments to courses & exams and scheduled training events.
- Instructors: Use this list to add information about internal and external instructors.
- Learners: Contains all learners.
- Primary skills: In the Primary Skills list you can maintain primary skills covered in training events.
- User E-Mail Templates for Employee Training: List of user defined e-mail templates.
- Promoted Links for Employee Training: Contains links that are visible as tiles in the Employee Training Management overview.
The lists are SharePoint standard lists with some additional functionalities, this means you can configure them as any other SharePoint list. You can change permissions, create additional columns, create or change views, create pages and add the lists as web parts, etc.
Pages
The app already created some pages that are used to display relevant information to learners, managers, instructors and organizers.
- For Learners: Displays links to the current user’s achievements, upcoming events and active self-paced training. Users can also browse courses & exams and upcoming training events and enroll themselves using the Browse courses & exams and upcoming training events link on the right.
- For Managers: Displays links to achievements and pending enrollment in the current user’s team. This view also displays all learners that are in the current user’s team and all available curriculums. Each learner can have a manager
- For Instructors: Displays links to courses & exams and scheduled training events where the current user is the instructor and also displays the enrolled attendees and pending achievements.
- For Organizers: Displays links to allows organizers to create curriculums, courses & exams and training events and manage learners. Also provides links to manage primary skills, instructors and e-mail templates.

The 4 areas and the welcome page are examples, an inspiration how to design landing pages for your audiences. Feel free to change them, change their content and provide the information your users need.
Permissions
By default all users (members, visitors and owners) have permissions to view all lists and items create by the app. In the enrollment, achievement and learner list, all users also have the permission to add items. This is necessary to allow users to enroll themselves in curriculums, courses & exams and scheduled training events.
If you want to read more on how to configure Permissions for Employee Training Management on SharePoint Online, read this article: How do I configure Permissions for Employee Training Management on SharePoint Online?
Feel free to contact our experts via support@sharepointsapiens.com if you have any questions. We are always happy to assist.